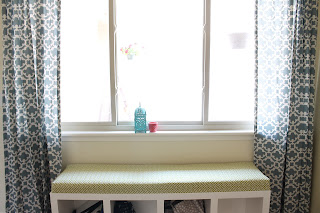
Here's the details on the entry bench you saw in the before and after post. It didn't always look so crisp and clean.
Marcos and I stopped by my favorite thrift store near my house not even looking for this guy. I had a vision of what I wanted for the entryway for a long time and had looked on and off for a while, but that particular day we were after something else (I can't even remember what now). Anyway, all we had done was pull in the parking lot when the clouds parted and the sun shone down on this beautiful little storage bench! Well it wasn't exactly beautiful at the time but I knew it would work perfectly for what I wanted.
It had a few dings and scrapes and lots of dirt and scuff marks but it was solid wood so I knew that would be easy to fix and structurally it was in great shape.
So we took him home and cleaned him off and then I started working. First, I sanded the whole thing down to give myself a fresh start on the wood. Then I primed and painted the whole thing (3 coats!) and finished it with a polyurethane protective finish. (Sorry no pictures!) Between our normal schedule, weather constraints, and trying to work during naptimes, that whole process took me several weeks. But when I was finally done and the paint and poly had cured, we flipped it over and took the casters off and brought it in the house. This is what our entryway looked like before we brought in the bench. We had that table in there which looked great but wasn't what I had envisioned. Plus, it was really good at accumulating junk!
You can sort of see the bench in all it's freshly painted glory in the picture below but I forgot to take a picture of it by itself before we started working on the cushion.
Now I realize our method for making a cushion for the bench was a little unorthodox, but remember that the title of this post is thrifty entry bench. I was attempting to work on a tight budget so we used what we had + free stuff. So, yes, what you just saw was a giant foam mattress topper complete with the eggshell texture and all. We had recently helped a friend move and she was trying to get rid of it. Coincidentally, I had just gone to look at craft foam and that stuff is EXPENSIVE! So of course the obvious solution was to cut up the mattress topper to use as the foam for our bench. Duh! So that is exactly what we did. Here it is all cut to size. We figured out after the fact that if you cut through foam with an electric knife it work a whole lot better than trying to use a box knife (which is what we did). Well (hopefully) you can't really tell that our line isn't quite straight.
I found this fabric at Hobby Lobby and I love love it!
The next step was to cut a board (we just used scrap plywood from the garage) the same size as our foam and the top of the bench. Then we just laid the foam on top of the plywood, wrapped the fabric around the foam and stapled it to the back of the plywood. It was definitely a 2-person job to make sure the fabric was staying straight and tight and stapling all at the same time. Here it is all finished and put together! Ta-da!
It really makes the entryway feel a lot more crisp and clean plus it's a great place to plop down when you need to take shoes on and off. Since both the garage door and the front door are off of this room, this is where all the traffic comes in and out so we really needed this to be a functional room. I'm still wanting some baskets for it but for now it's working to hold our bags (purse, diaper bag and library bag) in between trips.
Yay for a thrift store makeover! Love this guy!


